Never heard of an .htaccess file? You’re not alone! It’s a system file typically hidden in most CPanel/File Manager configurations. Unfortunately, if the file is configured wrong, it will make your website completely non-functional, which is why most people recommend not touching it.
However, we are going to present to you a few ways you can use the file, even if you don’t consider yourself to be “tech savvy.” Before you start, make sure to make a backup of the file prior to making any changes, so you can quickly restore the backup version if anything goes haywire.

Your objective in this chapter is to learn a few basic techniques to set up your .htaccess file.
What is an .htaccess File?
In a nutshell, an .htaccess file is created to tell your server how to handle certain circumstances. It’s a way for hosting companies to provide you more control over your server without providing you complete access to system files.
A few examples of things you can control are:
- Redirects
- Authentication
- Hide Certain Directories
- Control Error Pages
- Site Caching
- Block Bots
- Block IP Addresses (Visitors from Certain Countries)
We will not be covering most of these topics, but we want to provide you with a brief overview of some simple changes to make in order to better optimize your website.
Where is the .htaccess File Stored?
Typically a server will store the .htaccess file in the root directory of the site. However, sometimes the file will be moved for security reasons.
 There are two main methods to access the file. Before you begin, make sure you have access to your hosting server. Also, as a reminder, we encourage you to create a backup before beginning so you have a way to restore your site if there is an issue.
Method 1: Use an FTP software like FileZilla. You will need to use the login credentials that were sent when you purchased the hosting account.
Method 2: Use the Yoast SEO Plugin. Inside the plugin, on the left menu, hover over the “SEO” tab. Click “Edit Files” from the sub-menu. (This method is easier, but unfortunately with some configurations it will not work.) Using the Yoast method is easier than using FileZilla; however, if you type something incorrectly and the site does not work, you will need to either FTP in or use CPanel to restore the backup version.
How to Modify the .htaccess File
As previously mentioned, you can use either FileZilla or the Yoast plugin to edit the file. Most likely WordPress has already created the file and added a few lines of code to it. When you are adding lines of code, you will want to put your code at the beginning of the file. Again make sure to create a backup beforehand (I know I’m repeating this, but it’s important)!
Step 1: Go to the beginning of the first line and hit the “Enter” key a couple times. Next add a # and write a quick note about what you are adding, which tells the server to ignore this line but helps anyone that looks at the file in the future.
Step 2: Add in the code that you want and save your changes.
Step 3: Visit your site to make sure it still works. Test the change(s) you made. For example, if you are changing from the non-www version to the www version, then go to the non-www version to make sure it redirects properly.
Step 4: It’s easy to accidentally hit an extra key which makes the code not work. So, once you have finished your tests, we recommend backing up the entire site.
Setup Either www. or non-www. Version of Your Site
The main reason people modify their .htaccess file is so they can choose to use either the www or the non-www version of their site. (This can also be completed in the WordPress settings.)
Step 1: Open your .htaccess file in a text editor. (Don’t use a program like Microsoft Word, as the auto-editing will add formatting that could change the file and wreck it.) Notepad (on Windows) or TextEdit (on Mac) will be the standard. Another option is Sublime Text, but it requires downloading and installation.
Step 2: Decide which version you would like to use. Double check that you not already have this code in your .htaccess file. (Using both versions creates an endless loop that prevents your site from functioning properly.) To check, look at the code below and compare it to your .htaccess file. If it doesn’t show up, keep going. If it does show up in there and you would like to change to the other version, delete the current code and paste in the new code.
To default to the www version of the site, add the code below to your .htaccess, replacing “example” with your website, and “yyy” with your extension (i.e. .com, .org, .net, etc.).
#Force www version:
RewriteEngine on
RewriteCond %{HTTP_HOST} ^example.yyy [NC]
RewriteRule ^(.*)$ http://www.example.yyy/$1 [L,R=301,NC]
For the non-www. version you will want to use this version. Again, you will need to replace “example” with your website and the “yyy” with your extension (i.e. .com, .org, net, etc.).
#Force non-www version:
RewriteEngine on
RewriteCond %{HTTP_HOST} ^www\.example\.com [NC]
RewriteRule ^(.*)$ http://example.com/$1 [L,R=301]
Setup a Redirect Using .htaccess
One of the other main reasons to use the .htaccess is to add a redirect. While you can use plugins for this, the .htaccess is the best way.
Why would you need a redirect?
If a page needs to be moved to a new URL, or if you build a new website, often a few (or all) of the URLs will change. Having these redirects set up is important; if someone links to your old site, they will see a dead page.
To begin, you will need to know the old URL and the location of the new page. We recommend adding these to a text editor so you can copy/paste from one location as you create the file.
The code is pretty straight forward:
Redirect 301 /oldpage http://example.com/newpageIn this example we have created a redirect from the page “/oldpage” to “/newpage.” To break it down, we have 3 different parts:
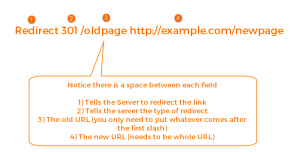
- Redirect: This tells the server to redirect from one page to another.
- Type of Redirect: This tells the server the type of redirect.
- Old URL: You do not need to enter the whole URL, only what comes after the main domain. In this example the full domain is http://example.com/oldpage
- New URL: You must have the full URL here. Make sure you get this correct, or you might redirect visitors to another site!
Final Thoughts
Having a basic knowledge of how the .htaccess file works can be very helpful if you find yourself in a pinch. While it has a number of very advanced functions it is relatively easy to use once you familiarize yourself with it. The file is not something that is changed very frequently, so a basic understanding is plenty for most business owners.
You’ve met your objective in this chapter of learning a few basic techniques to set up your .htaccess file.