Unless you’ve been sleeping under a rock for the last 8 years, you’ve heard how important social media is for businesses. Is a majority of the hype overemphasized? Sure. But we here at Orange Fox still believe developing social media accounts is an important step to take to grow your business.

Most small businesses never realistically generate a significant amount of business from their social media; however, developing these accounts sends a trust signal to both potential customers and search engines.
What Will I Learn?
In the following chapters of this guide, you will meet the following objectives:
- Build your Facebook Fan Page and optimize it for best results.
- Set up a Twitter account for your business.
- Create a LinkedIn page for your business.
- Locate and claim your Google My Business page.
- Learn about citations and discern the facts about citations from the myths.
- Learn about the different types and most commonly used redirects and how to successfully implement a 301 redirect.
- Understand the concept of backlink outreach and learn how to effectively implement backlink outreach for your site.
- Learn what sitemaps are, how to create them, and when to use them.
- Learn a few basic techniques to set up your .htaccess file.
Before we begin accomplishing these objectives, we want to first help you collect information you’ll need to streamline the social media setup process.
Building Your Social Media Empire
We recommend before getting started that you prepare a few pieces of information so you can rapidly setup your social media profiles.
Collecting Information to Setup Social Profiles
 Step 1: Decide what social media sites best relate to your audience and the business you run. The minimum sites we recommend include Facebook, Twitter and Linkedin. Depending on the type of business you run, you will also want to consider FourSquare, Pinterest, and YouTube. (We did not include Google+ in this list because it’s in its own category; needless to say, it is one of the most important profiles to complete.)
Step 2: Create a document that includes all your business information. We recommend creating a document where you can copy/paste all your data from while setting up your profiles. (We prefer Notepad for Windows.) Add in your business name, address, phone number, website, email and business description (should be around 140 characters).
Step 3: Collect photos and logo images. You will want to have your logo handy; ideally, it will be square and high resolution at 600 x 600 pixels or greater. Many popular websites also allow you to add a cover photo. This is a much larger photo that will display when people are on your profile. It should be different than your profile image/logo. This photo makes your profile more professional. Our recommendation is to take a photo of your office or building for this image.
If you don’t have a good idea for a cover photo, you can have one created for about $5 by using this website. However, be aware that quality varies on this site. Note: we highly discourage people from purchasing any sort of SEO services from this site. They are often black hat practices that can hurt your rankings (regardless of what the service providers say).
Once you have your image you will need to have it sized correctly for each site. In the past you had to do this manually, however we have found a great tool that makes it easy. Simply go to this website.

- Choose the image location (most likely your computer).
- Click “Browse” to find the file.
- Click “Upload” to begin editing.
Once the image has uploaded you should see a screen that looks like this:
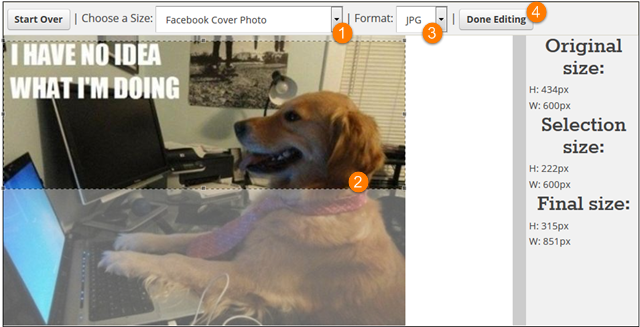
- Choose the site where you will use the image. You will need to go through each site and create a profile image. You will also want to create a cover photo; it should be different than your profile image.
- Drag the box to the portion of your photo you want to show. You can expand the size of the box, but it keeps the proportions aligned to prevent the image from stretching.
- Choose the format you want. We typically choose “PNG,” but “JPG” works great, too.
- Click “Done Editing” and you will be prompted to save the image. We recommend naming the image with the social media profile it’s associated with (for example, “[Your company’s name]-facebook-profile”). This helps you find the right photo for each site effortlessly.
You will need to repeat this process for each image you need.
Once you’ve accomplished these steps, you’ll be ready to begin setting up your social media profiles. When you’re ready, click “Next Chapter” below!