Your website is set up! Now it’s time to begin defining your business on the web by adding content.
Before you start writing away, take a few minutes and familiarize yourself with WordPress. At first, it may be overwhelming. Stick with it; it’ll soon become second nature to you.
We encourage you to browse through the different pages on your own and learn by trial. (The only one we encourage you to exercise with caution is “Editor” under “Appearance,” at least until you become more familiar with the site.)
Your objective in this chapter is to familiarize yourself with the following functions of WordPress: dashboard, sidebar, posts and pages and plugins.
Let’s get started.
How to Use WordPress – The Dashboard
When you log in to your site you land on the dashboard. See below.
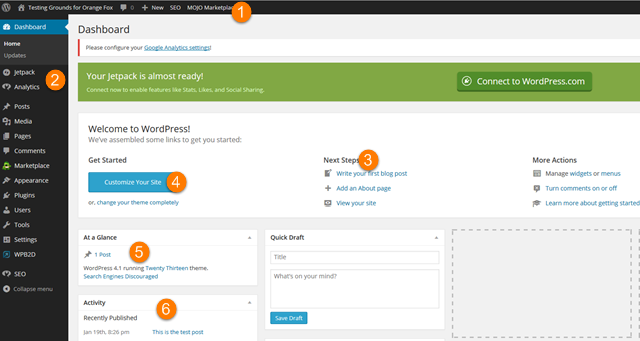
Your downloaded plugins will determine its appearance; some dashboards may look more complex than others.
However, the main menu items to note include:
- Header Menu – This menu will show on every page if you’re logged in. When you are in the “back end” (what only you see) of WordPress, click your site title to go to the homepage. Clicking your site title when on the “front end” (what visitors see), you will land on the dashboard. Note the “+ New” button; it is a quick way to add a new post or page.
- Left Hand/Sidebar Menu – This is the main navigation for the back end of WordPress. Almost any action you want to take can be found here. Most commonly used elements include: posts, pages, appearance, plugins and settings.
- Quick Launch Menu – On the dashboard you have a few shortcuts to create posts and make other changes quickly.
- Customize Your Site – Each theme is a little different. However, clicking here will bring you to a page to alter the look of your site.
- At a Glance – Quickly see how many posts and pages you have, as well as your theme.
- Activity – Here you will see your most recent posts.
Note: Boxes in the lower section can be rearranged depending on your preferences.
The Sidebar
Let’s take a closer look at the Sidebar Menu:
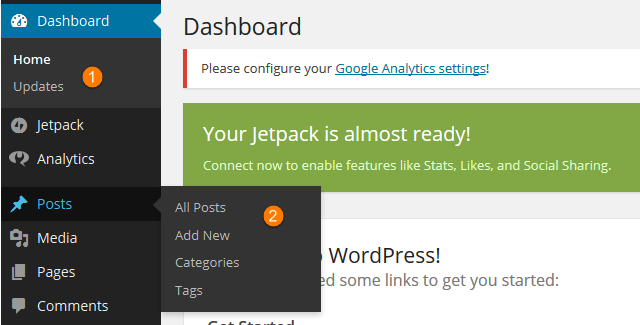
The menu will be your most used portion of WordPress. Get acquainted with it. The menu is designed to be visually appealing and small so you can quickly find what you need. As a result, not every option is visible when you first land on the page, but is located within side menus.
When you click on an item that section will expand to show all the individual items (see #1). Alternatively, for faster click-through, you can hover over a menu item (see #2) and choose what action you want to take.
The Posts/Pages Section
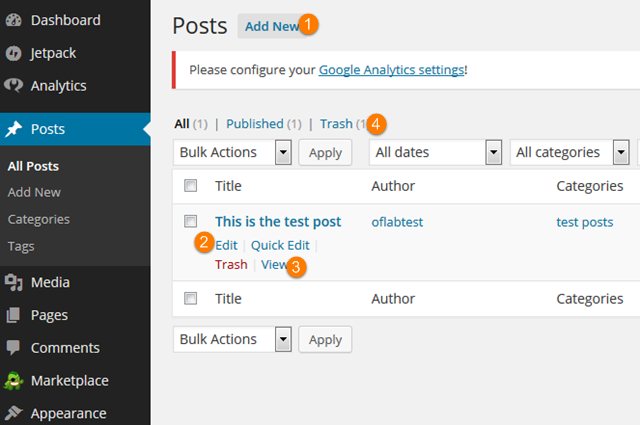
Next click on “Posts” to go to the “All Posts” section.
In WordPress there are two main options for adding posts and pages. From an editing perspective, both posts and pages will look similar, but they have very different functions.
Pages: main pages of your site. Pages that you create are automatically added to your menu. Common examples of pages include “About Us,” “Services,” etc.
Posts: designed for blog posts, where you add content regularly.
Options for Posts and Pages
When you land on your “Posts” page, you will see a list of all the posts currently on your blog. With a new site, there is always one “example” post. If you look at the screenshot above, you will see the basic layout.
To add a new post, click the button on the sidebar menu or click “Add New” from the “All Posts” page (see #1). Under each individual post, you will see 4 options:
- Edit (see #2). This brings you to the editing screen. Click “View” to see the post as it appears on your site to visitors.
- Quick Edit
- Trash (to delete the post). If you accidentally delete a post, it will appear here. To completely remove the post, you’ll have to go into the trash and remove them.
- View (see #4)
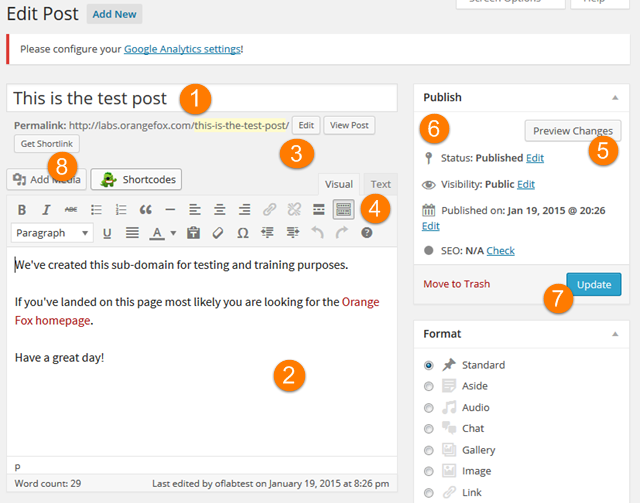
Editing Posts and Pages
Above is the edit screen. There are a lot of different elements, so stick with us! Hopefully some will appear familiar to you from using programs such as Microsoft Word and processing programs.
Here’s a quick rundown:
- Post Title – Add the title in here for the post. When a user lands on this page, that is the title they will see at the top of the page.
- Content Area – This is where you will add content. It works similar to other word processing programs. By default, you will see a visual editor to make it easier to see how a post appears to visitors. If you prefer the code version, click “Text” (above #4).
- Permalink/URL – Just above #3 is a button that says “Edit.” Click this button to change the URL where that post will appear. By default, WordPress uses a different format for URLs. Your version may say “Change Permalinks.” If so, we recommend changing them to provide a better experience for users and increased visibility in search engine rankings. (We’ll show you exactly how to do this later in the chapter.)
- Formatting Ribbon – This is the bar used to edit the way the look of the text. To the left of #4 in the screenshot above, you will see a highlighted button. This button offers a variety of editing options. Hovering over the icons will generate a brief description of the actions associated with each icon.
- Preview Changes – Click this to see a preview version of your post. This is a great feature to use; double check your post one last time privately before publishing the post live for the world to see.
- Save Draft – If you make an edit to the page, this button will appear (it does not appear otherwise). Click this to quickly save a copy of your work. By default, WordPress will auto-save your work. However, it’s a great idea to always make sure your work is saved before you walk away. After you publish a post, this button is no longer available.
- Publish/Update – When you want the post to go public, click this button. Before the post becomes live, it will say “Publish.” After it is live, it will change to “Update.”
- Add Media – A great website needs images. “Add Media” allows you to add images quickly. When you click this button a screen will appear with all of the images already saved on your site. If the image has not been saved to your site simply click “Upload Files” an you can either drag the image into the box or click “Browse” to find it on your computer.
Those are the main elements you need to be aware of when editing a post or a page.
The Plugins
Plugins are an easy way to add features to your website.
Note: the more plugins you have, the slower your site will functionn, so we encourage you to only add the plugins you need.
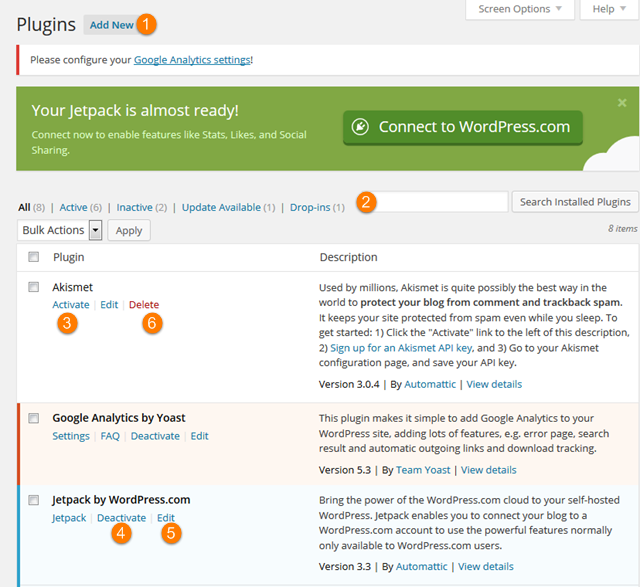
The image above is a screenshot of our plugins page. If you haven’t added any you will most likely only see one or two. Let’s review the elements on this page:
- Add New Plugin – Click this button to install a new plugin. (More on this below.)
- Search Installed Plugins – This is a quick way to find plugins you have already installed. If you need to find a new one click “Add New Plugin.”
- Activate – When you install a plugin it will be deactivated. Click this button to activate it.
- Deactivate – If you have issues with your site working properly chances are it’s an issue with a plugin. By clicking “Deactivate” it keeps the data stored in the plugin, but it does not affect your site.
- Edit – If you are a coder you can click this button to edit the code. If not, ignore the edit button.
- Delete – If you no longer need a plugin this is how you delete it. You will have to deactivate it prior to deleting.
Add Plugins
When you are ready to add plugins there are two options: you can upload one that you have downloaded from another site, or you can search WordPress’s database. Once you click “Add New Plugin” you should see a page that looks like this:
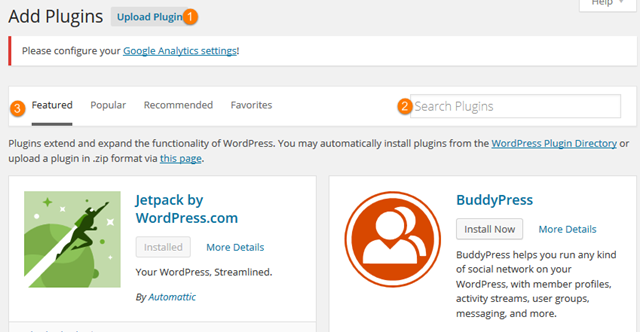
There are a few different options for adding plugins:
- Upload Plugin – If you’ve downloaded or purchased a plugin you will need to click “Upload Plugin” to upload it. You can drag and drop the zip file or click “Browse” to find it. Note: if you upload a plugin make sure to leave it in a zip format (don’t unzip it before uploading it).
- Search Plugins – Here you can search for specific plugins by name. On the next screen click “Install” next to the plugin you want to install. This method is a bit easier than downloading and uploading plugins manually.
- Recommended Plugins – If you are new to WordPress most likely you don’t know many good plugins. You can click through these 4 options (Featured, Popular, Recommended and Favorites) to find some of the best ones.
Note: The more plugins on your site, the slower it will operate. In addition, sometimes plugins conflict with each other, so the more you add, the greater your chance of running conflicting plugins. Yes, plugins can add some great features to your site, but we encourage you to only use the minimum amount necessary.
Final Thoughts
You’ve met your objective in this chapter of familiarizing yourself with the following functions of WordPress: dashboard, sidebar, posts, pages and plugins.
Hopefully you feel more comfortable navigating WordPress. You don’t need to be an expert at this point, but you should have enough knowledge to get started adding content to your website. We recommend that you spend some time right now to click around and see what options and actions are available before your website has traffic or content. If you’re going to mess something up, now’s the time to do it!
Go nuts, make a few posts, add images and see how they look. Once you are feeling comfortable, head over to the next chapter!