Connecting Your Domain to Hosting and Installing WordPress
You’ve done a lot of prep work up to this point. Now, it’s time to setup your website!
Your objective in this chapter is to create a live website that visitors can see.
What You Will Need:
- Registrar login information and purchased URL
- Hosting account details (received via e-mail from hosting company)
- Approximately 30 minutes
Before we begin, log in to your registrar (where your domain is registered). We will show you how to connect a domain from GoDaddy and 1and1.com to a host using CPanel. (Most registrars have a similar process, so even if you’re not using GoDaddy or 1and1, you should be able to follow along!)
How To Connect Your Domain/URL to a Hosting Account
Via GoDaddy
Step 1: Log in to your account. (For most sites, this is in the upper right hand corner.) When you are logged in to GoDaddy, you will land on your dashboard. Find the field marked Domains. Click “Launch.”

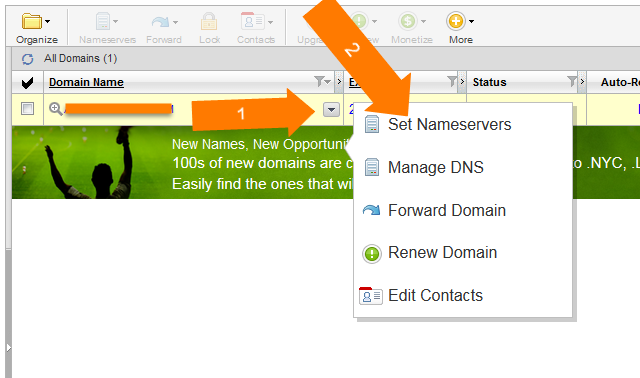
Step 2: You’ll see a list of your domains. Find the domain you are ready to set up. From the drop-down menu associated with that domain, click “Set Nameservers.”
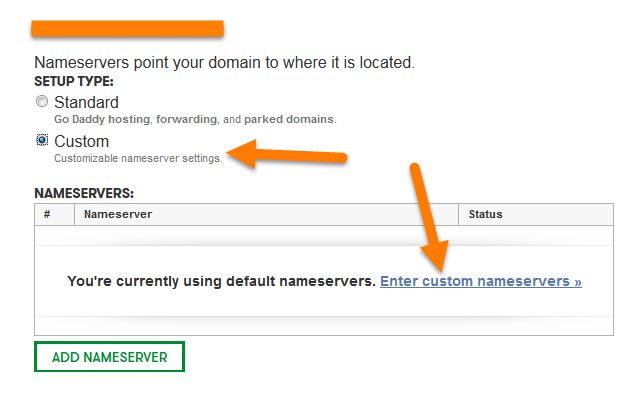
Step 3: Click “Custom” so you can add your nameservers. Click “Enter custom nameservers.”
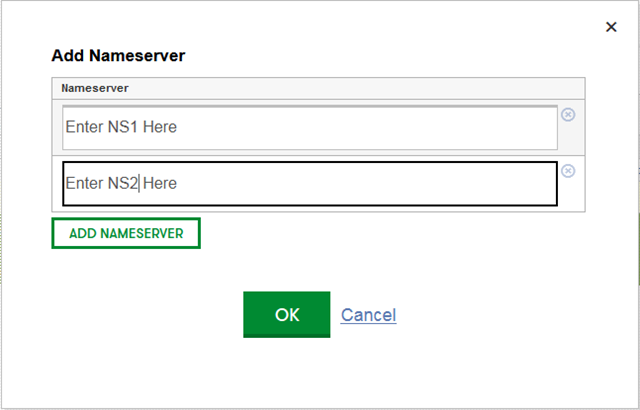
Step 4: On this page you will need to enter your nameservers. Open the e-mail from your hosting company (if you’ve lost it, contact your hosting company for another copy). It should look something like this:
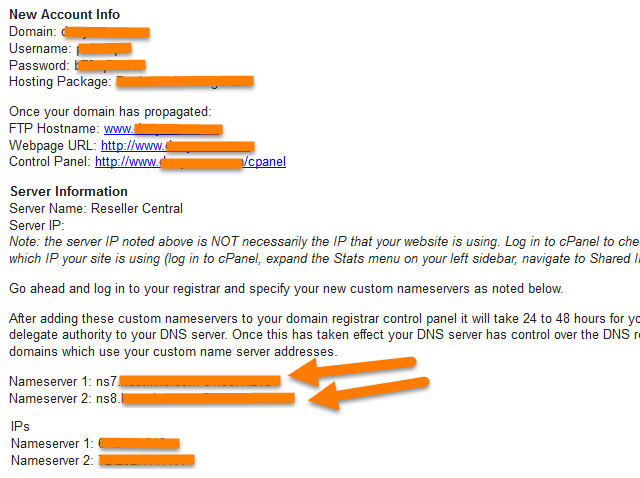
Copy the nameservers from the email and paste them in at GoDaddy. Note: make sure to delete any extra spaces before or after the nameservers.
Click “OK” and then “Save.” This is all that you need to do at your registrar! Now, we will make sure the domain is in hosting.
Via 1and1
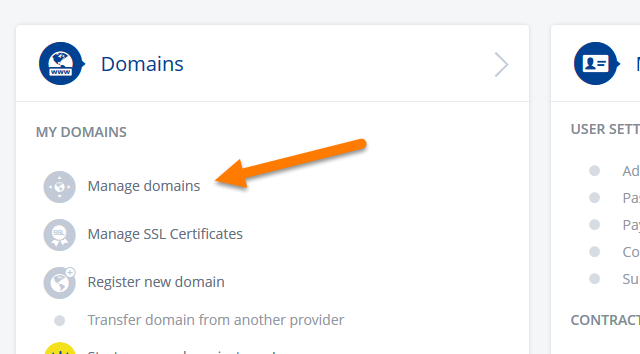
Step 1: Log in to 1and1 (typically found in upper right hand corner). You’ll land on your dashboard. Under “Domains,” click “Manage domains.”
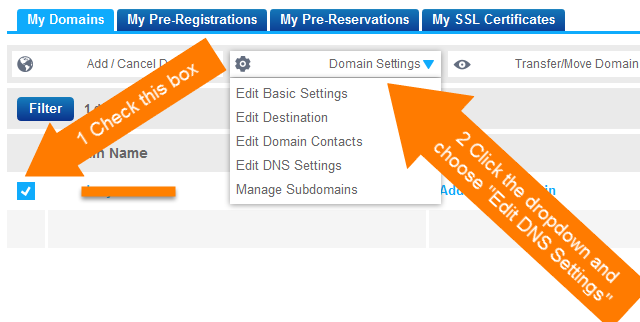
Step 2: Check the box next to the domain you are setting up. In the drop down titled “Domain Settings,” click on “Edit DNS Settings”.
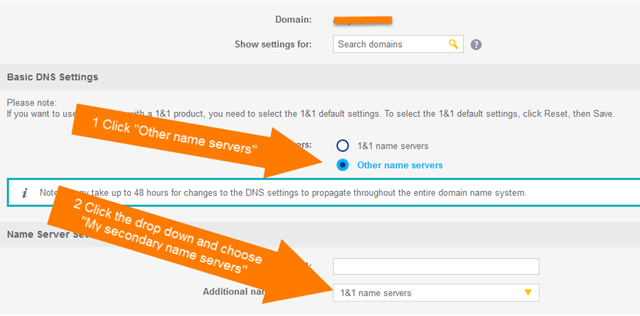
On this screen you will need to click “Other name servers.” A new field will appear. Click the drop down next to “Additional name servers,” and choose “My secondary name servers.” This will reveal a new box where you can add your name server.
Step 3: Open the email from your hosting company, it should look something like this (if you’ve lost it you will need to request it from your hosting company):
Step 4: Copy the nameservers from the e-mail and paste them in at 1and1. Make sure to delete any extra spaces before or after the nameservers. Click the “Save” button. A pop-up will confirm that you want to change your nameserver; click to confirm and you’ll see a success message.
That is all you will have to do at your registrar! Next, we’ll make sure the domain is in hosting.
Adding Your Domain/URL to a Hosting Account
When you purchase a hosting account, you are required to enter an associated URL. If you use the domain you are attempting to set up then you can skip this step. If you are adding this domain as an already existing hosting account, then follow along below.
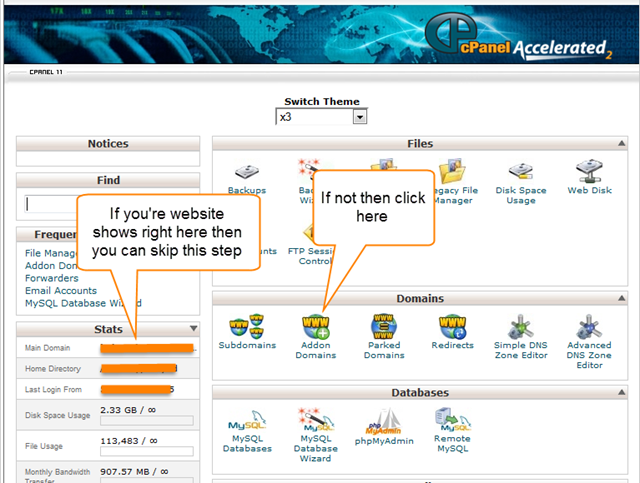
Step 1: Log in to your CPanel. (A link to the CPanel should be located in the e-mail from your hosting account). You will probably see 2 URLS: yourdomain.com/cpanel and a series of numbers or letters. You want the one that does not contain your domain name. If you don’t see it, check for another e-mail that has it.
Step 2: You’ll see a screen that looks like the image above.
- Click “Addon Domains.”
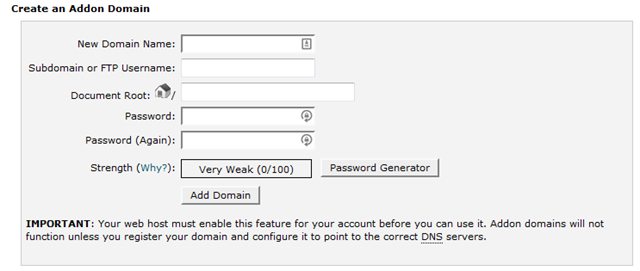
- On the next screen you will need to add your domain. Paste your URL in the “New Domain Name” field (do not include “http://” or the “www.”).
- Click the “Subdomain or FTP Username” field (it should auto fill) and the “Document Root” field.
- Choose a password, (for connecting via File Transfer Protocol or FTP). It’s important to choose a complex password and keep it somewhere safe.
- Click “Add Domain.”
Yay! You’ve connected the accounts. Hopefully it wasn’t too difficult.
Now, let’s install WordPress!
How to Install WordPress
There are a few different ways to install WordPress; we’ll show you the easiest way!
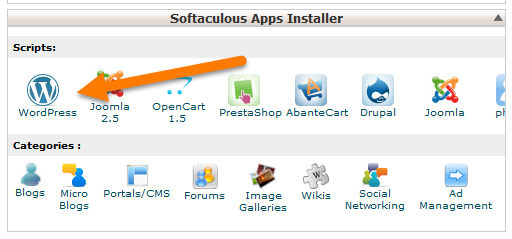
Step 1: Log in to your CPanel account. Scroll to the bottom. Look for “Softaculous Apps” box. Click “WordPress.”
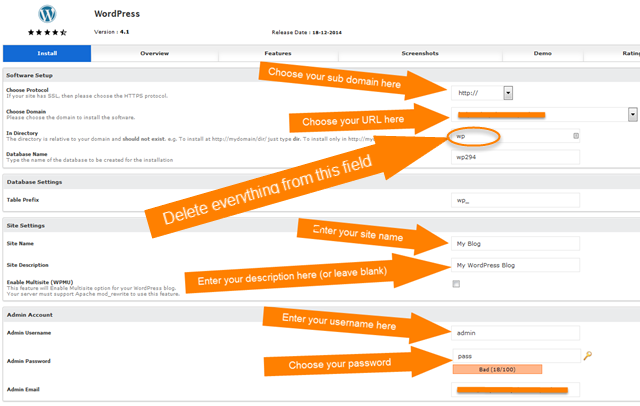
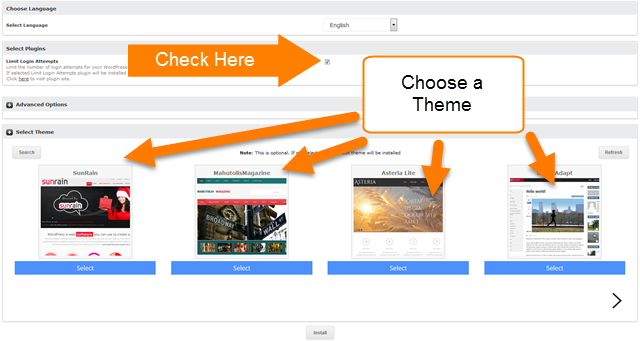
Step 2: Your screen should look like this:
Follow below step-by-step:
- Choose Protocol: Choose the sub-domain you want to use (www or non-www)
- Choose Domain: If you have multiple domains on this CPanel you will need to choose the one you want to use.
- In Directory: The field should be blank. If you have “wp” here then your site will be at “example.com/wp” instead of “example.com.”
- Database Name: Leave this field as-is (unless you have a reason to change it).
- Table Prefix: Leave this field as-is (unless you have a reason to change it).
- Site Name: This is the title of your website. Whatever you enter here will be shown in the browser tab to visitors. This can be altered easily at a later time.
- Site Description: This is the description of your site. We recommend a one-sentence description. Again, this can be altered easily at a later time.
- Enable Multisite (WPMU): Leave this blank, unless you have a reason to change it.
- Admin Username: This will be your login id. Make sure you use something different than “admin” for security purposes. Also, store this information somewhere safe.
- Admin Password: This is your login password.
- Admin Email: This is the e-mail tied to your login account. It will be used if you need to reset your password.
- Select Language: The language of your website.
- Limit Login Attempts: This will help to prevent hackers from getting into your website. We recommend checking this box. (It will lock out someone that has entered the wrong password too many times.)
- Advanced Options: You shouldn’t need to worry about these; however, feel free to check them out.
- Select Theme: These are a few of the free themes you can install with your site. If you don’t choose one it will install the default WordPress theme. (This can be changed later.)
- Before clicking “Install,” we recommend adding your email to the box near the bottom. Doing this will ensure you receive an email of your details so you can store them somewhere safe.
- Click “Install” (near the bottom).
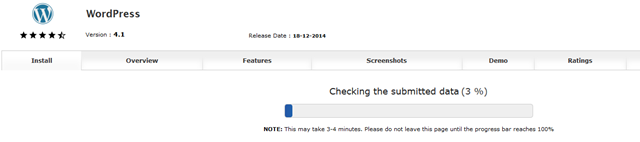
Once you click “Install,” you should see a screen like this:
Once it completes you will see a success message like this:
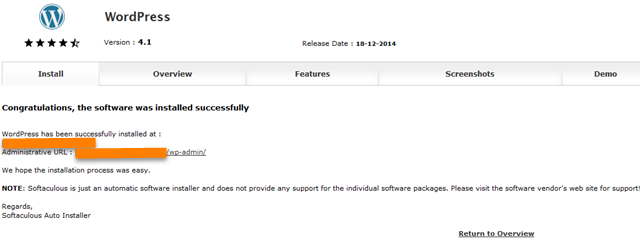
Make sure to copy these URLs. The first links to the homepage and the second one links to the login page.
Final Thoughts
Congratulations!
You’ve met your objective of creating a live website that visitors can see.
As of this moment, your website is live! Of course, there’s nothing on it yet, but there will be soon.
Join us in the next chapter and we’ll walk you through adding content!